
Essential tips to help recover your Mac
My friend Julian Velard is a musician and a geek. But as hard as JV
drives his MacBook Pro—and he does push it to its limits, using live
audio plug-ins for his keyboards onstage–when the computer acts up, I’m
the one he texts for support. (Fair’s fair: If I can’t remember how to
play a minor major seventh, Julian’s the one I call. We’re all experts
in something.)
When Julian called late last week, his MacBook Pro wouldn’t turn on;
it would get stuck on the Gray Screen of Stomach Pain Inducement and
never move forward. Over chat, phone, and then in person when he made
the trek from Brooklyn to my New Jersey home, I walked JV through my
steps for resuscitating a Mac that won’t start up. Let me share them
with you too, since you may not have my number.
Step 1: Run Disk Utility
 |
If your Mac won’t boot, there could be many issues at play. But the one I like to rule out right away—or
repair, if possible—is any problem afflicting the hard drive. The
easiest first step on that front is to run Disk Utility. On a Mac
running Mountain Lion, you can run Disk Utility by booting into OS X Recovery Mode.
Make sure the Mac is off. (If it’s not responsive because it’s stuck
on a gray, blue, or white screen, just hold down the Mac’s power button
for several long seconds until it gives up and shuts off.) Hold down the
Command and R keys, and power the Mac back up again.
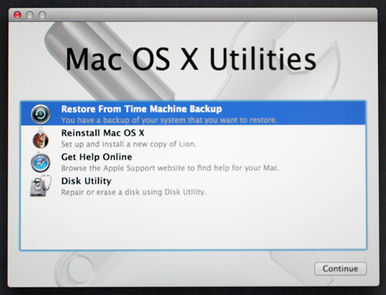
Eventually, you’ll end up on a screen headlined OS X Utilities. (Once
you see that screen, you can release the keys you were holding down.)
Click on Disk Utility. Then, click on your Mac’s built-in hard
drive in the left column of Disk Utility. (Usually, you’ll see two
listings for your built-in drive: The first includes the drive’s size,
like 500GB, in its name; and nested underneath it is your drive’s
friendlier name. You want that second one.) On the lower right of the
Disk Utility window, click Verify Disk, and then wait while Disk Utility does its thing.
In Julian’s case, Disk Utility said that it had found errors and we ought to repair them. We clicked Repair Disk,
and Disk Utility eventually claimed it had repaired some problems. But
Julian’s Mac was still misbehaving, so we moved on to step two.
Step 2: Safe Boot
Safe Boot limits what checks and functionality your Mac focuses on
during startup, and performs certain diagnostics. It’s rare, but
sometimes you can get your unhappy Mac to start up successfully with a
Safe Boot, and then restart it normally, and everything returns to
hunky-doryness.
Shut the Mac down, and start it up while holding down Shift. Safe
Boot can take a while if it does indeed work. To get some feedback about
what's happening, you might choose to start up while holding down
Shift, Command, and V: That enters both Safe Boot and something called Verbose Mode, which spits out some messages about what Safe Boot is actually trying to do as it goes.
Be patient during your Safe Boot. If the Mac does start up, restart
it from the Apple menu once the desktop finishes loading completely. If
the Mac starts up normally, go on with your day. Otherwise, keep working
through this list. In JV’s case, his Mac wouldn’t restart normally
following a successful Safe Boot. So, we moved on to the harder-core
options.
Step 3: Fsck for fsck’s sake
This step is actually kind of fun—at least when it’s not your Mac that’s under the weather. It’s fun because it feels so geeky.
Shut the Mac off, and start it up again while holding Command and S.
You’re launching Single User Mode. You can release the keys when the
intimidating black screen with messages in white text appears.
Wait until the command-line prompt appears, when all the text is done scrolling past. Then, you’ll type
fsck -fy and hit Return. And wait. Possibly for several long minutes.
Eventually, after five different checks that take varying amounts of
time, you should get to one of two messages: “The volume [your Mac’s
name] appears to be OK” or “FILE SYSTEM WAS MODIFIED.” If you encounter
the first message, type
reboot and press Return. If you see the latter message, though, you’ll want to run fsck -fy all over again. You can retype the command and hit Return, or press the Up arrow once and then press Return.
Ideally, you’d eventually get to the “…appears to be OK” message, type
reboot, and find that your Mac now starts up perfectly. Julian’s Mac had other ideas.Step 4: Reinstall Mountain Lion
Remember OS X Recovery from Step 1? You can use it to reinstall
Mountain Lion, too. Boot into Recovery mode, and then click to install
Mountain Lion and follow the on-screen prompts.
We tried that on Julian’s Mac, and after the whole installation process was complete, JV’s Mac did start working again. Briefly.
Then, all the same problems started recurring: crashes, kernel
panics, and eventually a failure to start up successfully at all. Uh-oh.
A brief but hugely important pause
Long before this step, long before even Step 1 in fact, you should
know the state of your backups. Julian’s state was that he didn’t have
enough backed up. That’s a lousy state to be in. I’ve gone through my own backup plan elsewhere. Recently, we did a series of backup stories, including "Backup basics" and "How to set up Time Machine." This is the moment you'll wish you read those stories.
At this stage in JV’s process, I was very concerned about his data.
During one of our successful bouts of getting the Mac working for a while, Julian signed up for the online backup service CrashPlan
and copied over his most important files to a pair of external hard
drives. But his failure to back up religiously made the trying Mac
issues Julian faced not just a frustrating annoyance and time-suck, but
terrifying, too. He could have lost hundreds of files representing
thousands of hours of work.
Step 5: Reset the NVRAM, because, why not?
In the PowerPC days, we talked about resetting the PRAM. On modern
Macs, the real term is resetting the NVRAM. The name refers to special
memory sections on your Mac that store data that persists even when the
Mac is shut off, like volume settings, screen resolution, and similar
options.
Resetting that data isn’t harmful, and quite frankly it’s also rarely genuinely useful. But man, at this point, it can’t hurt.
You might need to grow an extra finger or two for this one, or have a
friend help you out. Hold down all of these keys: Command, Option, P,
and R, and turn on the Mac. Keeping holding the keys down until you hear
the Mac restart again. Apple says to let it restart just the one time; I
usually listen for a second reboot, and then release the keys.
In some cases, after performing this step, your Mac will restart
normally. In other cases, if your luck is as bad as Julian’s was, you
might instead see a progress bar on startup. If the progress bar fills
up and then the Mac starts up, you’re likely good to go. In JV’s case,
however, his Mac actually shut down at around the halfway point in the
progress bar.
It was time for Step 6. Oh, Step 6.
Step 6: Make a Genius Bar appointment
Julian and I went to my local Apple Store with his Mac. We made one rookie mistake, which I’ll get to in a moment.
We explained the problem in detail, and went over all the steps we’d
already tried. That was good. The Genius behind the bar agreed that it
was probably a hard drive issue, and wanted to check to see whether the
drive simply needed reformatting, or actually exhibited bad sectors
indicating it needed to be replaced.
While we were there, Julian realized he hadn’t backed up certain
important files that had been on his Mac’s desktop. The Genius we worked
with (Adam) could get Julian’s Mac to boot in Recovery mode, as we had,
and we were able to copy the other files from it. But our mistake was
that we’d left Julian’s external drives back home. So JV had to plunk
down extra cash to buy a thumb drive at the Apple Store, onto which we
then copied those other files.
After consulting with a second Genius, Adam rendered his verdict:
Because the drive wasn’t reporting any bad sectors, reformatting it and
starting over would likely cure what ailed Julian’s Mac.
We returned to my house, fired up OS X Recovery again, and launched
Disk Utility once more, choosing to erase Julian’s Mac completely. Then
we reinstalled Mountain Lion again.
The Mac started up beautifully. Julian returned home to New York.
Several hours later, as he restored his data from his backups,
Julian’s Mac started behaving badly again. Eventually it crashed hard,
and again refused to start up.
Double uh-oh.
Step 7: Go back to the Genius Bar again
Sometimes, even the best experts get it wrong. The new diagnosis for
Julian’s Mac was that it was, in fact, a logic board failure, and not a
fault with his drive at all. Apple took custody of JV’s MacBook Pro, and
in a few days (and for nearly $300), the store will swap out the
laptop’s logic board.
So did we waste all our time with the earlier steps? Hardly.
First, we managed to get Julian’s Mac usable enough to back up crucial data. That was probably the most important step we took.
Second, all those steps ruled out numerous other issues; it was
because of the freshly-wiped hard drive that the new Genius was able to
conclude a logic board failure was to blame for JV’s Mac’s problems.
Lessons learned
So while our steps didn’t work this time around, that’s only in the
sense of “actually solving the problem at hand.” They did help to ensure
the safety of Julian’s data, and at least led us to the eventual
answer. (Possibly, anyway. It could be that the logic board diagnosis is
off-base, too.)
But having these steps and awkward key combinations committed to
memory, or saved to an iPad, or stuck on your refrigerator—that can make
coping with your next Mac disaster considerably less stressful.
Presuming your backups are current, anyway.
No comments:
Post a Comment